


# The Ultimate Guide to Chain Link Sign Brackets Selection Installation and Expert Tips
Chain link sign brackets are the unsung heroes of effective signage. These simple yet critical components are what securely attach your sign to a chain link fence, transforming a plain barrier into a powerful communication tool. Whether for a construction site, a school, a warehouse, or a commercial property, the right bracket ensures your message is seen, secure, and professional. This comprehensive guide dives deep into everything you need to know, from selecting the perfect hardware to a foolproof installation process.
UNDERSTANDING THE CORE COMPONENTS AND THEIR PURPOSE
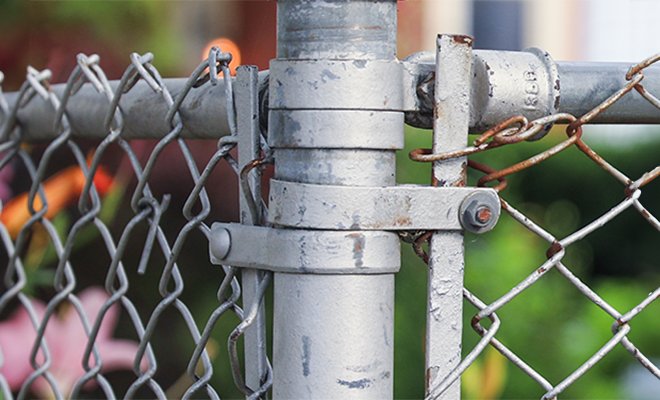
Before choosing a bracket, it is crucial to understand what you are working with. A chain link sign bracket system typically consists of three main parts. The bracket itself is usually a formed metal piece that hooks onto the fence fabric or frame. Fasteners, such as bolts, nuts, and washers, secure the bracket and the sign together. Finally, the sign panel is mounted onto the bracket. The primary goal is to provide a rigid, stable mounting point without damaging the fence integrity. A study by the International Sign Association highlights that proper mounting hardware can extend the visible life of a sign by up to 40 percent by preventing stress fractures and material fatigue (来源: International Sign Association).
IDENTIFYING YOUR SPECIFIC NEEDS AND SEARCH INTENT
When someone searches for chain link sign brackets, their intent is usually transactional or commercial. They likely have a sign and a fence and need the specific hardware to connect them. However, beneath that simple need are critical questions about material, size, durability, and compliance. Are you posting a temporary safety warning or a permanent company logo? The answer dictates everything. Based on my experience with commercial clients, the most common mistake is underestimating wind load and environmental factors, leading to failed installations within the first major storm.
KEY TYPES OF CHAIN LINK FENCE SIGN BRACKETS COMPARED
Not all brackets are created equal. The right choice depends on your fence type, sign material, and permanence. Here is a detailed comparison of the two most prevalent types.
| Bracket Type | Best For | Installation Method | Pros | Cons |
|---|---|---|---|---|
| J-Hook or C-Channel Brackets | Temporary signs, corrugated plastic, lighter materials. | Hooks directly onto the chain link fabric; secured with zip ties or bolts through the sign. | Very affordable, easy to install and remove, no fence modification needed. | Less secure in high wind, can sag over time, not suitable for heavy signs. |
| Universal Angle Brackets | Permanent signs, heavy plywood or aluminum signs, high-wind areas. | Bolts directly to the fence post or frame using clamps or through-bolts. | Extremely rigid and secure, handles heavy loads, professional appearance. | More expensive, requires tools to install, may require drilling into fence frame. |
Other notable types include slide-on brackets for square posts and heavy-duty u-bolt kits for round posts. The material is also key. Galvanized steel offers excellent rust resistance for outdoor use, while powder-coated aluminum provides a lighter weight option with good durability.
A STEP BY STEP GUIDE TO INSTALLING CHAIN LINK SIGN BRACKETS
Follow this five step process for a secure and lasting installation. You will need your sign, brackets, fasteners, a drill, a wrench or socket set, a level, and possibly a step ladder.
STEP 1: GATHER MATERIALS AND ASSESS THE LOCATION. Choose your bracket type based on the guide above. Ensure you have all nuts, bolts, and washers. Select a fence location that is highly visible and where the post or fabric is taut and undamaged.
STEP 2: POSITION AND MARK THE BRACKET. Hold the bracket against the fence post or fabric at the desired height. Use a level to ensure it is perfectly horizontal. Mark the drilling points on the fence frame or the mounting points on the sign itself with a marker.
STEP 3: SECURE THE BRACKET TO THE FENCE. For J-hooks, simply hook them onto the chain link mesh. For universal brackets, clamp or bolt them to the fence post at your marked locations. Tighten all hardware firmly but do not over-torque, as this can strip threads or deform metal.
STEP 4: MOUNT THE SIGN TO THE BRACKET. Place your sign against the installed brackets. Align the pre-drilled holes in the sign with the holes in the bracket. Insert bolts from the front of the sign through to the bracket and secure them tightly at the back with nuts and washers. A lock washer is recommended to prevent vibration from loosening the connection.
STEP 5: FINAL CHECK AND ADJUSTMENT. Double-check that all fasteners are tight. Give the sign a gentle shake to test stability. Use the level once more to confirm the sign is straight. Make any final adjustments before considering the job complete.
COMMON MISTAKES AND CRITICAL WARNINGS TO AVOID
ATTENTION: IGNORING THESE POINTS CAN LEAD TO SIGN FAILURE, PROPERTY DAMAGE, OR PERSONAL INJURY.
One major error is using fasteners that are too short. The bolt must be long enough to pass through the sign, the bracket, and still allow for a proper nut and washer setup. Another is mounting a large, flat sign without considering wind. A sign acts like a sail; for areas over 10 square feet, consider a vented sign material or additional bracing. Perhaps the most frequent oversight is material incompatibility. Using plain steel hardware with an aluminum sign can cause galvanic corrosion, which severely weakens the joint over time. Always use compatible metals or stainless steel hardware.
MAXIMIZING IMPACT AND ENSURING COMPLIANCE WITH YOUR SIGNAGE
Your bracket is just the support. The sign itself must be effective. Ensure graphics are high-contrast and text is large enough to read from a distance. For regulatory signs, compliance is non-negotiable. OSHA, for example, has specific requirements for safety sign placement and visibility in workplaces (来源: OSHA Standard 1910.145). Furthermore, consider the viewing angle. A sign mounted flat against a fence is only visible from directly in front. Using stand-off brackets or angling the sign slightly can greatly improve visibility from oblique approaches.
MAINTENANCE AND LONG TERM CARE FOR YOUR INSTALLATION
Even the best installation requires occasional check ups. We recommend a bi-annual inspection. Look for loose bolts, signs of rust or corrosion on the brackets, and any deformation in the sign or fence from wind stress. Tighten any loose hardware immediately. If rust is present on steel brackets, clean the area and apply a touch up paint designed for metal to prevent further deterioration. This simple routine can add years to your signage system.
FINAL CHECKLIST FOR CHAIN LINK SIGN BRACKET SUCCESS
Use this actionable checklist before, during, and after your project to guarantee optimal results.
CONFIRM THE SIGN SIZE AND WEIGHT TO SELECT BRACKET TYPE.
CHOOSE BRACKET AND HARDWARE MATERIAL SUITED FOR THE ENVIRONMENT.
VERIFY LOCAL CODES OR OSHA RULES FOR SIGN PLACEMENT.
INSPECT THE FENCE POST OR FABRIC FOR STRENGTH AND CONDITION.
USE A LEVEL DURING INSTALLATION FOR A PROFESSIONAL RESULT.
SECURE ALL FASTENERS WITH APPROPRIATE WASHERS AND NUTS.
CONDUCT A STABILITY TEST BY APPLYING GENTLE PRESSURE.
SCHEDULE BI-ANNUAL INSPECTIONS FOR MAINTENANCE.
By following this guide, you move beyond just attaching a sign. You are implementing a durable, compliant, and effective communication solution. The right chain link sign brackets are a small investment that pays significant dividends in safety, branding, and information clarity.


